How to Make a Spider Web Beanie: A Step-by-Step Guide for Beginners
Published: 28 Jan 2026
If you’re looking for a fun and creative DIY project, making a spider web beanie is a perfect choice! Whether you’re gearing up for Halloween, looking to add a unique accessory to your winter wardrobe, or simply enjoying a crafting challenge, a spider web beanie combines practicality with a spooky twist. This step-by-step guide is designed specifically for beginners, so if you’re new to knitting or crocheting, don’t worry – we’ll walk you through each stage. From choosing the right materials to adding the perfect spider web design, you’ll learn everything you need to create your own cozy, stylish, and eye-catching beanie. Let’s get started!
What is a Spider Web Beanie?
A spider web beanie is a knitted or crocheted hat that features a distinctive spider web design, either woven directly into the fabric or added as an embroidered pattern. The design typically consists of intricate, crisscrossing lines that resemble a spider’s web, often in contrasting colors to make the pattern stand out.
The Trend Behind Spider Web Beanies
- A spider web beanie is a beanie hat featuring a spider web design, typically either woven into the fabric or added as an embroidered pattern. This accessory has grown in popularity due to its unique, bold aesthetic that appeals to a variety of fashion subcultures.
- The trend behind spider web beanies is rooted in both alternative fashion and seasonal designs. Many people embrace them for their edgy and spooky vibe, particularly during the Halloween season.
Why They’re Perfect for Halloween and Winter
- Halloween Appeal: Spider web beanies are a popular accessory for Halloween, blending the creepy vibe of spiders and webs with the warmth of winter headwear. These beanies add a fun, spooky touch to any Halloween costume, whether for a simple look or a more elaborate outfit.
- Winter Versatility: Beyond Halloween, the spider web design adds an interesting and creative twist to standard winter beanies. They’re great for expressing personal style during the colder months, and their knitted design keeps you warm while making a fashion statement.

Materials Needed for Your Spider Web Beanie
Creating a spider web beanie requires some basic materials, whether you’re knitting or crocheting. Here’s a breakdown of what you’ll need for both methods:
Yarn
- Acrylic Yarn: Lightweight, easy to work with, and affordable, acrylic yarn is a popular choice for beginners. It’s also durable and can be machine-washed.
- Wool Yarn: Offers a softer, warmer feel and is ideal for colder weather. Wool is great for making cozy beanies, but it requires more care when washing.
- Cotton Yarn: Soft, breathable, and cool, cotton is a good choice for lighter beanies but may not be as warm as wool or acrylic.
- Glow-in-the-Dark Yarn (Optional): For an added spooky effect, especially for Halloween, glow-in-the-dark yarn can make your spider web pattern pop when the lights go out.
Crochet Hook or Knitting Needles
- Crochet Hook: Choose a hook size that matches your yarn thickness. Typically, for worsted-weight yarn, a 5mm (H-8) crochet hook works well.
- Knitting Needles: If you’re knitting the beanie, use circular needles (16-inch circular needles are ideal for the crown) or double-pointed needles for the decrease section. Select the needle size according to your yarn weight.
Stitch Markers and Tapestry Needle
- Stitch Markers: Essential for marking your rounds or pattern points, stitch markers help keep track of your progress, especially when adding the spider web design.
- Tapestry Needle: You’ll need this to weave in loose ends and sew the spider web design or any additional elements like a spider charm.
How to Make the Base Beanie
Creating the base of your spider web beanie is the first step before adding the spider web design. Whether you’re crocheting or knitting, this is the foundation of your project. Here’s how to get started:
Choose Your Method: Crochet vs. Knitting
- Crochet: Crocheting the base is typically faster and allows for more control over the structure. It’s especially good for beginners.
- Knitting: Knitting gives the beanie a smooth, stretchy texture and can be great for a more traditional look.
Start With the Crown
- Crochet: Begin by creating a magic circle (also known as a ring or loop) to form the top of the hat. Crochet in a spiral, increasing stitches as you go to expand the crown. Continue to add rounds until it fits the desired diameter of your head.
- Knitting: Cast on the required number of stitches (usually around 80-100 stitches, depending on your yarn thickness and the size of the beanie). Use circular needles to knit in the round and start decreasing when you reach the desired width for the crown.
Shape the Beanie
- Crochet: After forming the crown, crochet in a straight line down to form the body of the beanie. Ensure that you keep the tension consistent so the beanie fits snugly. You can add a few rows of single crochet or half-double crochet to make the sides more structured.
- Knitting: Continue knitting in the round, ensuring the beanie fits your head comfortably. If you’re working with a ribbed stitch pattern (such as k1, p1), it will provide a stretchy fit.
Creating the Spider Web Pattern
Now that you have your base beanie, it’s time to add the spider web design! You can either incorporate the web into the beanie as you create it or add it on top afterward. Below are the methods for both crochet and knitting to help you create a stunning spider web pattern.
1. Method 1: Incorporating the Spider Web During Construction
- Crochet Method:
- Step 1: Once your beanie’s body is ready, determine where you want to start the web pattern (usually from the crown or halfway down the beanie).
- Step 2: For a basic spider web, create a series of chain stitches to form the web’s spokes. These spokes can be made by simply crocheting vertically from the center of the crown and outward, like rays of a web.
- Step 3: Work in rounds or rows to create the concentric circles (or “rings”) that will connect the spokes. You can use chain stitches or slip stitches to form the circles between the spokes.
- Step 4: Continue adding more rings and spokes as desired, ensuring they’re evenly spaced. Each ring should get larger as you go down the beanie, mimicking a spider web’s natural structure.
- Step 5: If you’d like, you can add small “webbing” details between the spokes using a simple cross-stitch or chain stitch for a more intricate design.
- Step 1: Once your beanie’s body is ready, determine where you want to start the web pattern (usually from the crown or halfway down the beanie).
- Knitting Method:
- Step 1: Use a color contrast or simple yarn-over technique to create the spider web effect. Start by knitting a few rows for the background.
- Step 2: When you reach the area where you want the web, begin adding “spokes” with a yarn-over technique. These spokes should radiate from the center of the crown outward.
- Step 3: Add rings of web by alternating knit and purl stitches, or use a lace pattern for the web’s rings.
- Step 4: Continue knitting in this pattern for each row, gradually increasing the width of the rings as you move down to maintain the shape of a web.
- Step 1: Use a color contrast or simple yarn-over technique to create the spider web effect. Start by knitting a few rows for the background.
Method 2: Adding the Spider Web Design After the Beanie is Complete
If you prefer to keep the beanie’s base simple and add the spider web design afterward, here’s how to go about it:
Crochet Method:
- Step 1: Use a contrasting color (such as white, silver, or glow-in-the-dark yarn) for the spider web design.
- Step 2: Position the beanie so you can easily work in a circular motion on the top part of the beanie where the web will go.
- Step 3: Use a simple back stitch or slip stitch to outline the web pattern. Start by creating the central “hub” of the web, then add spokes in all directions.
- Step 4: Once the spokes are done, work on connecting them with rings to form the web. You can use chain stitches to create circular lines.
- Step 5: Work in a circular pattern until you’re happy with the design, adjusting for symmetry.
Knitting Method:
- Step 1: With a contrasting yarn, thread a tapestry needle and begin adding the web design on top of the finished beanie.
- Step 2: Start from the center of the crown and stitch outwards to form the spokes.
- Step 3: Add the concentric rings between the spokes using a simple stitch or a more complex lace stitch to replicate the look of a spider’s web.
- Step 4: Secure the stitches neatly, ensuring no loose ends are visible. Be careful not to pull too tightly, as this could distort the shape of the web.
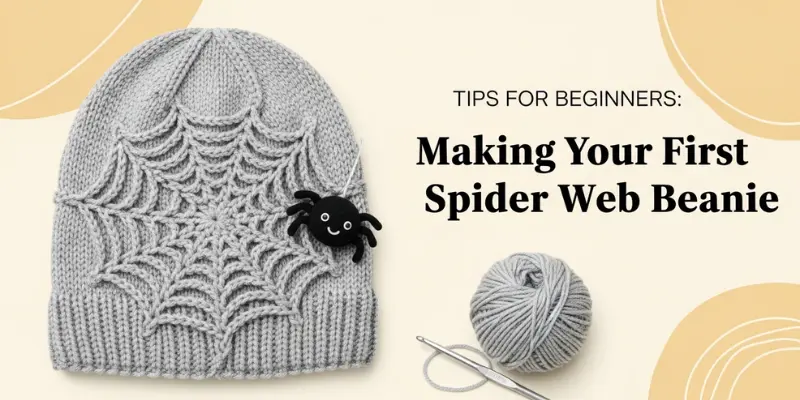
Tips for Beginners: Making Your First Spider Web Beanie
Creating your first spider web beanie can be an exciting project, but it might feel a bit overwhelming if you’re new to crochet or knitting. Here are some beginner-friendly tips to help you get started and make the process smoother and more enjoyable.
Start with a Simple Design
- Keep it Basic: For your first spider web beanie, focus on a simple web design rather than a highly detailed one. You can always add complexity later once you feel more confident with the basics.
- Choose a Basic Web Pattern: Stick to creating basic spokes and concentric rings for your web. This will give you a clear structure to follow and help you avoid getting overwhelmed.
Use the Right Yarn
- Opt for a Medium Weight Yarn: Worsted-weight yarn is a good starting point for beginners. It’s thick enough to be easy to work with but not too heavy, making it a great option for beanies.
- Choose Smooth Yarn: Yarn that’s smooth and not too fuzzy will make it easier to see your stitches, which is especially helpful for beginners.
Choose the Right Tools
- Use a Comfortable Crochet Hook or Knitting Needles: If you’re crocheting, a size H-8 (5mm) crochet hook works well with medium-weight yarn. For knitting, a set of 16-inch circular needles will work for most beanie sizes.
- Stitch Markers Are Your Friend: Use stitch markers to mark the beginning of each round or row. This helps you keep track of your progress and ensures that your spider web design stays even.
Practice Your Stitches
- Crochet Basics: If you’re new to crochet, practice the basic stitches (chain stitch, slip stitch, double crochet) before starting your beanie. This will help you gain confidence and improve your stitch consistency.
- Knitting Basics: For knitting, practice casting on, knitting, and purling before you start your project. Learning the basic knit stitch is essential for creating the smooth fabric needed for a beanie.
Adding Final Touches to Your Beanie
Once you’ve completed the base of your spider web beanie and added the spider web pattern, it’s time to add the finishing touches that will elevate your project to the next level. Here’s how to ensure your beanie looks professional and polished:
Weaving in Loose Ends
- Tidy Up Your Work: After finishing your beanie, you’ll likely have loose yarn ends from the beginning and end of your yarn. Use a tapestry needle to weave in these ends, working them through the stitches, so they stay secure and aren’t visible.
- Tip: Weave the yarn through the same color stitches to make the ends less noticeable and avoid them sticking out.
Blocking Your Beanie
- What is Blocking? Blocking is the process of shaping your beanie to help it hold its form and smooth out any uneven areas. It’s especially helpful if your beanie looks slightly misshapen or has a bit of curling at the edges.
- How to Block:
- Lightly dampen the beanie with water (using a spray bottle or by soaking it briefly).
- Lay it flat on a towel, gently shaping it into the desired size.
- Allow it to air dry, making sure to check the shape periodically.
- Lightly dampen the beanie with water (using a spray bottle or by soaking it briefly).
Adding a Spider Embellishment (Optional)
- Crocheted or Knitted Spider: For a fun, spooky touch, you can crochet or knit a small spider to attach to your beanie. This adds character and makes the design even more eye-catching.
- Use black yarn to create a simple spider shape and attach it securely to the center or side of the web.
- Use black yarn to create a simple spider shape and attach it securely to the center or side of the web.
- Spider Charm: Alternatively, you can attach a small spider charm using a strong thread. Simply sew it onto the beanie where you want the spider to sit.
- Glow-in-the-Dark Embellishments: If you’re making the beanie for Halloween, adding glow-in-the-dark yarn or small glow-in-the-dark spider charms will make your beanie stand out in the dark!
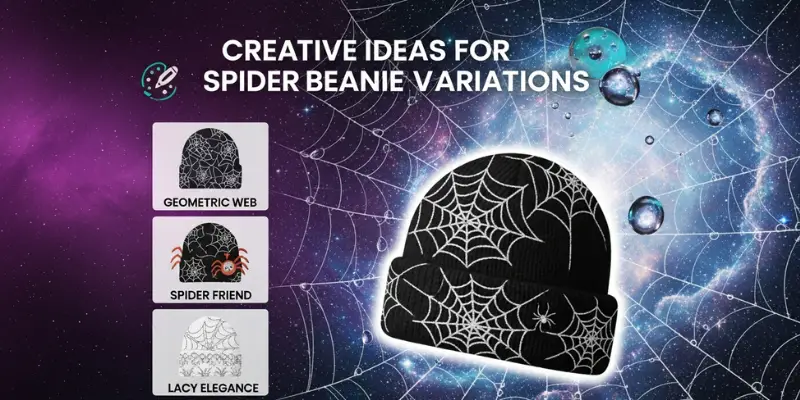
Creative Ideas for Spider Web Beanie Variations
If you’re looking to make your spider web beanie unique, there are many creative ways to customize it and give it a personal touch. Whether you want to add a bit of flair or change the overall look, here are some fun variations to inspire your next project:
Different Beanie Styles
- Slouchy Beanie: A relaxed, loose-fitting style that adds a laid-back vibe. It’s perfect if you prefer a more casual, comfy look while still showing off your spider web design.
- Cuffed Beanie: A classic beanie with a folded-up cuff at the base. It’s a timeless style that gives the beanie a snug fit around the head, keeping it cozy and stylish.
- Newsboy Hat Style: For a more vintage or edgy twist, try making a spider web beanie in a newsboy style. This hat typically features a small brim, giving it a slightly different look while still showcasing your web design.
- Beret Style: Add a spider web pattern to a beret for a chic, sophisticated twist. A beret provides a different shape but can still be a fashionable way to wear a web design.
- Cat-Ear Beanie: For a fun and playful variation, try making a spider web beanie with cute cat ears on top. This adds a whimsical element to your design while still incorporating the spider web theme.
Creative Web Design Variations
- High Contrast Web: Use bold, contrasting yarn colors for the spider web to create a sharp, graphic effect. For example, white or neon yarn on a black base will make the web stand out dramatically.
- Monochrome Web: If you prefer a more subtle look, create a web using yarn in similar shades to the beanie itself. This creates a textured, almost hidden design that’s less bold but still interesting.
- Glow-in-the-Dark Web: Perfect for Halloween or spooky vibes, use glow-in-the-dark yarn for the web. It will light up in the dark, adding a fun, eerie element to your beanie.
- Textured Web: Add texture to the web by using raised stitches or puff stitches in the crochet design. This will make the web feel more 3D and stand out with an added layer of visual interest.
Add-on Embellishments
- Small Spider Charm: For an added spooky touch, crochet or buy a small spider charm and sew it onto the beanie where the web meets. This can enhance the web design and give your beanie more character.
- Knitted or Crocheted Spider: If you’re feeling crafty, make a small spider using yarn or embroidery floss. Attach it securely to the web for a cute and creepy detail.
- Pom-Pom with a Twist: Instead of a traditional pom-pom, create a pom-pom with a spider web pattern on it, or attach small spider embellishments to a regular pom-pom for a quirky touch.
- Beads or Sequins: Add some sparkle to the web by sewing small beads or sequins in the center of the web or along the spokes. This will give your beanie a glamorous look, perfect for events or parties.
Frequently Asked Questions About Spider Web Beanies
Here are some common questions people have when making or wearing spider web beanies.
Medium-weight acrylic or wool yarn works best for a cozy, durable beanie.
Yes, you can, though the web design will be subtler with a single color.
It typically takes a few hours to a couple of days, depending on your skill level.
Yes, with basic crochet or knitting skills, beginners can create a simple spider web design.
Adjust the number of stitches in the base to fit the head’s circumference.
Yes, you can stitch the web onto an existing beanie using embroidery thread.
Maintain consistent tension and use a simple, even stitch pattern.
Conclusion
Creating a spider web beanie is a fun and creative way to express your personal style, whether you’re gearing up for Halloween, adding a spooky touch to your winter wardrobe, or simply enjoying a new DIY project. From choosing the right materials to experimenting with different designs and embellishments, there are endless ways to make your beanie unique. By following the steps outlined in this guide, beginners and experienced crafters alike can make their own stylish spider web beanie. So, grab your yarn and hooks, get creative, and enjoy making a cozy, fun accessory that’s sure to turn heads!


- Be Respectful
- Stay Relevant
- Stay Positive
- True Feedback
- Encourage Discussion
- Avoid Spamming
- No Fake News
- Don't Copy-Paste
- No Personal Attacks
- Be Respectful
- Stay Relevant
- Stay Positive
- True Feedback
- Encourage Discussion
- Avoid Spamming
- No Fake News
- Don't Copy-Paste
- No Personal Attacks
